TFT Beginner Mantra
Choose the right champion!
A Visual Guide to Help Beginners Succeed in TeamFight Tactics (TFT) Game
Welcome to TFT !
TFT is an auto-battler strategy game set in the exciting world of League of Legends! But instead of controlling champions directly, you’re the tactician behind the scenes. Your role? Pick champions, place them on a chess-like board, and watch your strategy unfold.
What’s the most important part of TFT?
Keep scrolling down to get to know the champions!
In TFT, there are over 60 champions. Champions are your chess pieces, but they come with unique traits and roles that influence their strengths and how they interact with others. Here's the challenge...


Each champion belongs to multiple synergy groups and serves specific roles.
On top of that, they have key stats like Health, Attack Power, Ability Power, Damage...
With so much to consider, building a team can feel overwhelming...
That’s why we’ve created a series of data visualizations to simplify the process and help you pick champions more effectively.
Let’s break it down and guide you through the essentials of champion selection!
Part 1: The Power of Synergies
In TeamFight Tactics (TFT), synergy is everything. Each champion belongs to one or more trait groups, and combining champions with the same trait unlocks powerful bonuses that can turn the tide of battle. Whether you’re assembling a resilient wall of Bruisers or a team of Spellcasters unleashing devastating magic, crafting a team with synergistic traits is the ultimate strategy for success.
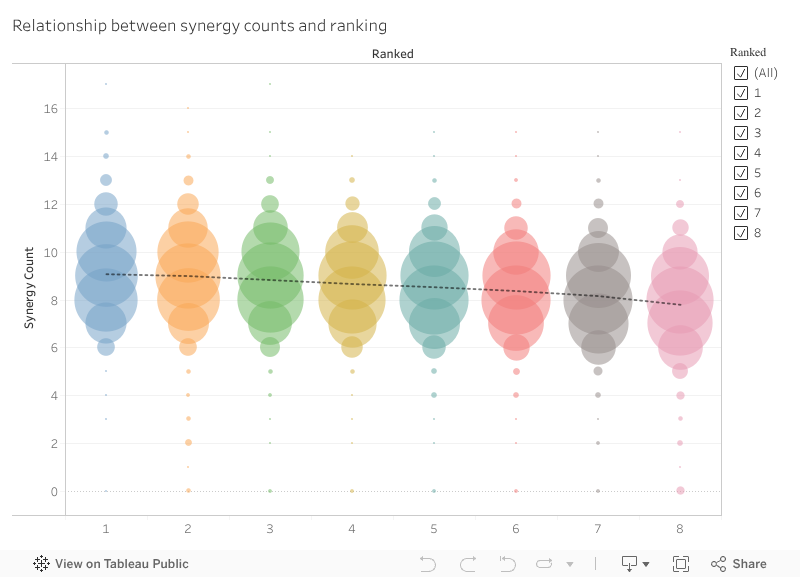
From analyzing over 7,000 games, we’ve discovered that synergies are closely linked to game placement.
Insights:
More synergies = Better ranking !
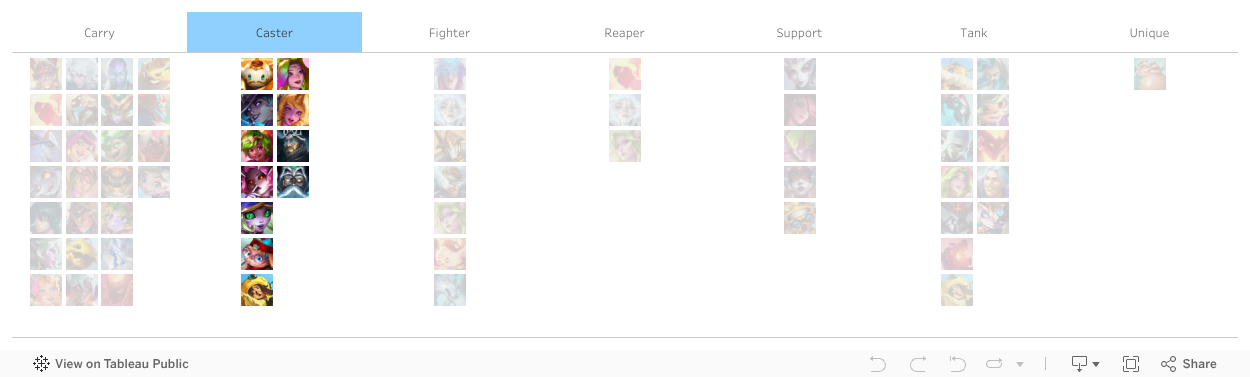
This matrix can help you quickly find the trait synergies for each champion.

Ready to start planning your perfect team? Use the network below to explore champion synergies and build your strategy!
Here's
how
it works:
- Nodes and Edges: Each champion is a node, and lines
(edges)
connect champions that share traits. For
example, champions who are both "Brawler" and "Dragon" will have a line connecting those
traits.
- Highlights Synergy Overlaps: The network helps you spot
champions that belong to multiple groups, making
it easier to build versatile teams.
- >Filter by Trait or Cost: Use the interactive tools to
filter champions based on their traits or costs.
For instance, you can highlight all 1-cost champions to build a strong early-game strategy or
focus on
high-cost champions for late-game dominance.
These following visuals make understanding synergies much simpler, but you will still need to :

Plan Ahead:
Identify champions that fit your desired synergy before committing to a strategy.

Adapt Quickly:
If your ideal champions aren’t showing up, pivot to new synergies based on available options.

Maximize Efficiency:
Use multi-trait champions to activate multiple bonuses at once, optimizing your team’s power.
Synergies Are Only Half the Battle...
It’s not enough to just stack synergies and hope for the best. To truly dominate in TFT, you need to understand what each champion brings to the table. Even the most synergized team will fall apart if your champions aren’t pulling their weight in the right roles. Roles are the secret sauce that hold your team together.
They define how your champions perform, where they shine, and where they might fall short. To truly master TFT, you’ll need to understand these roles inside out. But that’s not all, some champions within each role are simply better, stronger, and more reliable than the rest. Knowing how to pick the right ones can make all the difference. And once you’ve locked in your perfect team, their placement on the chessboard becomes your next challenge.
Part 2: Champion Roles: Your Guide to Strength and Placement
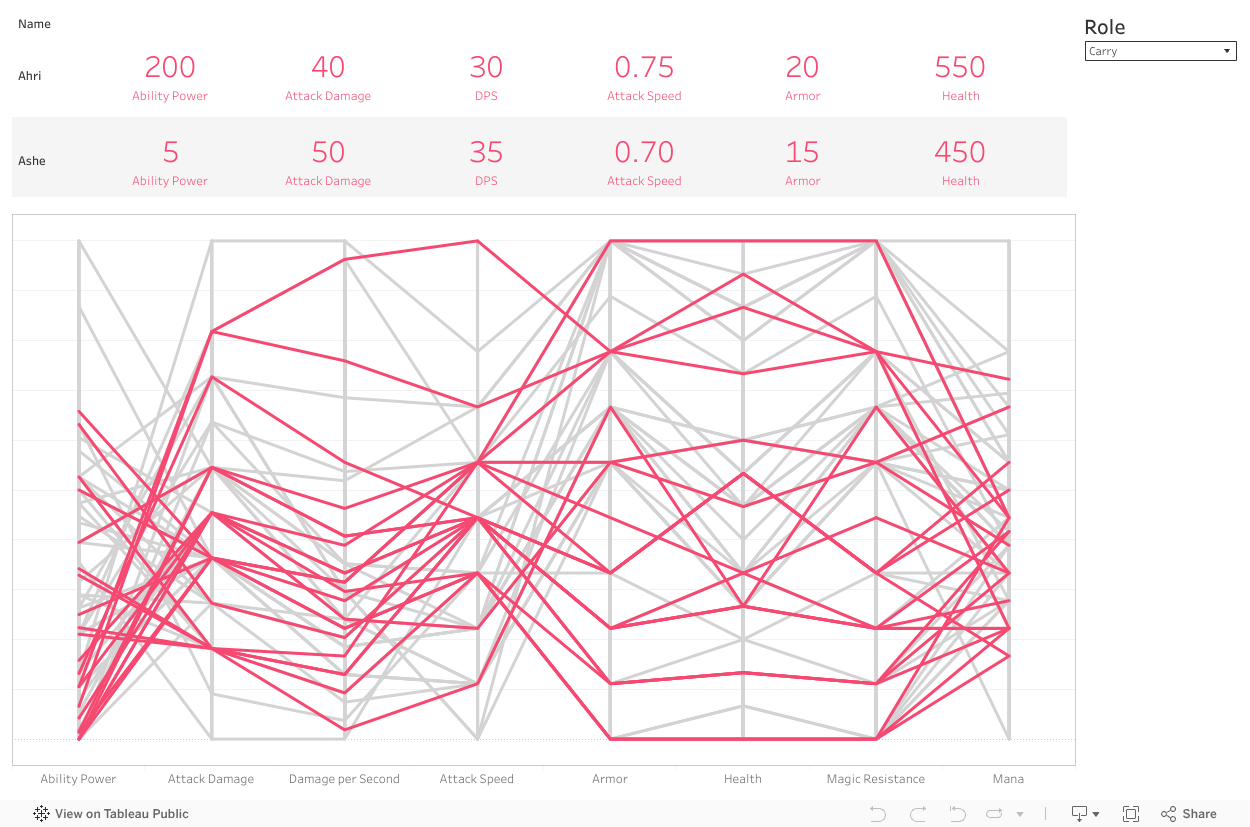
In order to better understand each group of champions, we’ve created this radar chart to visually represent their unique strengths and characteristics. Each chart highlights the key attributes of a specific role—such as DPS, HP, Armor, or Mana—allowing you to quickly see what each group excels at and where they might have weaknesses. This helps you make informed decisions when building your team, ensuring you can balance strengths and cover weaknesses effectively.

Insights:
Carry = DPS and Attack Damage (AD)
Carries are your primary source of damage, capable of dealing consistent high DPS (Damage Per Second). However, they are typically fragile and rely on Tanks or Supports to protect them.

Insights:
Caster = Mana and Ability Power (AP)
Casters focus on dealing burst damage with powerful abilities. They depend heavily on mana to activate their abilities and are most effective when supported by champions who can buy them time to cast.

Insights:
Fighter = HP (Health Points) and DPS
Fighters are versatile champions that balance offense and defense. They are durable enough to stay in the fight but also deal significant damage.

Insights:
Support = Mana and Utility Abilities
Supports enhance your team by healing, shielding, or buffing allies. They don’t typically deal much damage but are critical for keeping your team alive and functioning.

Insights:
Reaper = Attack Damage (AD) and Mana
Reapers are specialists with unique effects that can disrupt opponents or deliver finishing blows. They often focus on exploiting enemy weaknesses or creating openings for your team.

Insights:
Tank = Armor and HP (Health Points)
Tanks are the protectors of your team, soaking up damage and controlling the battlefield. They excel at standing in the frontline, absorbing enemy attacks, and shielding more fragile champions.
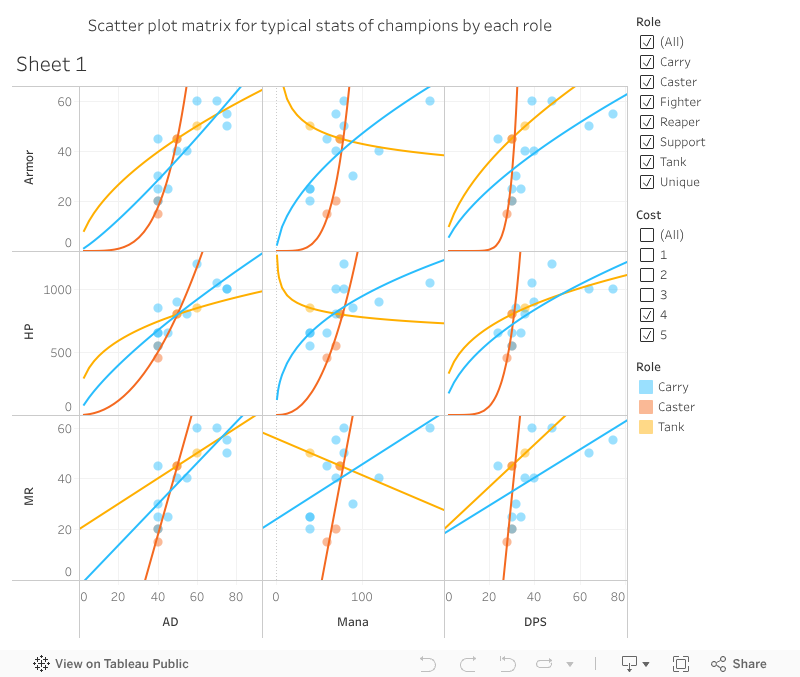
While the radar charts provide a clear and visually engaging summary of each role's strengths and weaknesses, the matrix offers deeper insight into the underlying relationships between specific stats across all champions. For example, the strong linear relationship between AD and DPS confirms that high attack damage champions are consistently strong damage dealers. Meanwhile, Tanks exhibit a clear positive correlation between HP and Armor, emphasizing their defensive specialization. Outliers are also easy to spot—champions that deviate significantly from the trendlines can offer unique advantages, such as a Fighter with unusually high DPS or a Tank with above-average HP.
Want to pick the strongest champions from
each group easily?
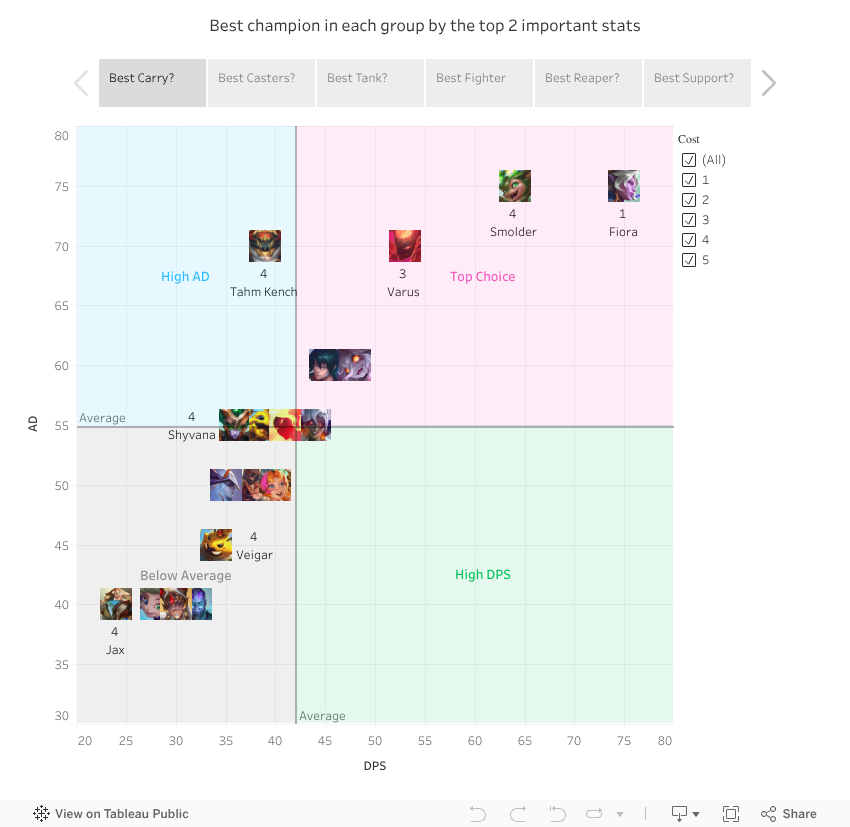
Looking for the strongest champions in each group? This scatterplot simplifies the process by
showcasing
role-specific distributions of champion attributes. It highlights outliers and helps you quickly spot
the most impactful champions for each role. Each plot focuses on two key attributes critical to that
role, making it easier to identify standout performers within their category.
This interactive tool allows you to filter champions by role and cost, making it effortless to
compare and choose champions for a well-rounded team. Whether you're looking for a top DPS carry, a
sturdy tank, or a reliable support, this chart empowers you to assemble the most effective lineup
with ease.

For example, champions with high Attack Damage (AD) and DPS dominate the
top-right corner for carries, while tanks with superior HP and Armor cluster in high-value zones.
Exceptional outliers, such as Smolder for DPS or Tahm Kench for AD, are clearly visible, helping you
make informed decisions.
Looking for the strongest champions in each group? This scatterplot simplifies the process by showcasing role-specific distributions of champion attributes. It highlights outliers and helps you quickly spot the most impactful champions for each role. Each plot focuses on two key attributes critical to that role, making it easier to identify standout performers within their category.
This interactive tool allows you to filter champions by role and cost, making it effortless to compare and choose champions for a well-rounded team. Whether you're looking for a top DPS carry, a sturdy tank, or a reliable support, this chart empowers you to assemble the most effective lineup with ease.
For example, champions with high Attack Damage (AD) and DPS dominate the top-right corner for carries, while tanks with superior HP and Armor cluster in high-value zones. Exceptional outliers, such as Smolder for DPS or Tahm Kench for AD, are clearly visible, helping you make informed decisions.
Have a team in mind but unsure which champions to add next?
Looking for the strongest champions in each group? This parallel coordinate plot simplifies the process by showcasing role-specific distributions of champion attributes. It highlights outliers and helps you quickly spot the most impactful champions for each role. Each plot focuses on two key attributes critical to that role, making it easier to identify standout performers within their category.
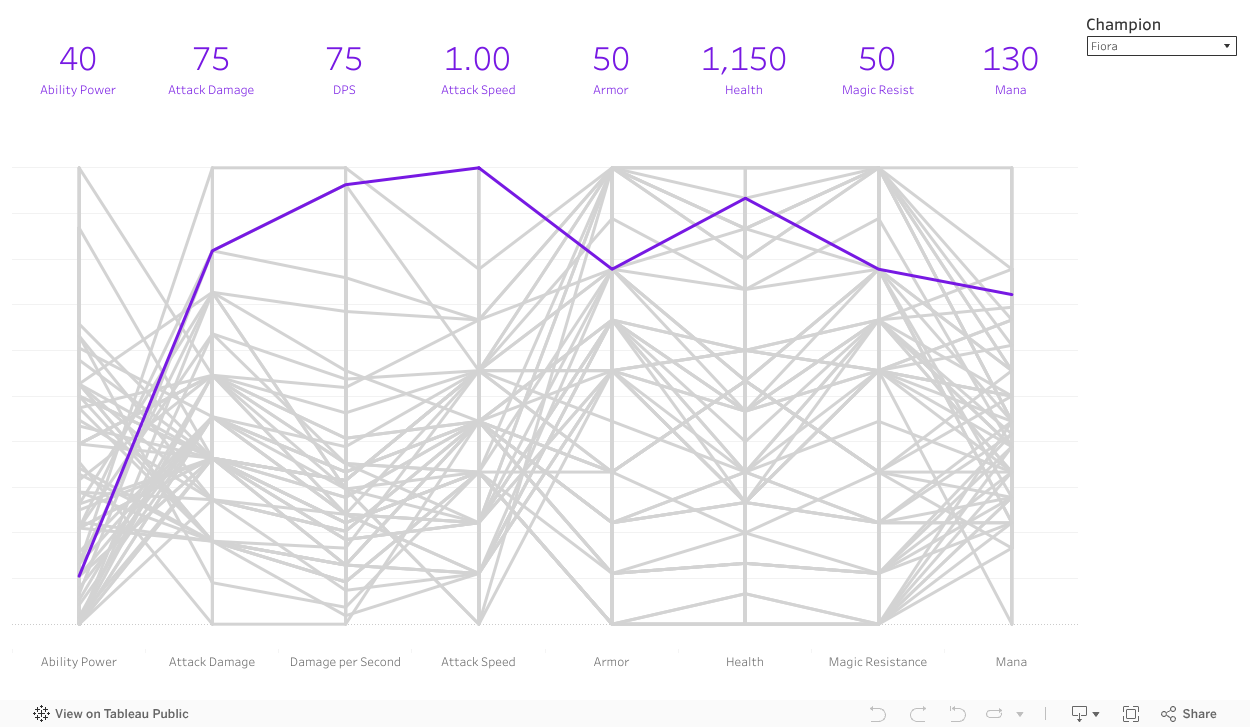
Additionally, you can filter the graph by role to find champions with specific skillsets that align with your strategy.
Side Note: Why We Focus on 1-Star Champion Data
Looking for the strongest champions in each group? This scatterplot simplifies the process by showcasing role-specific distributions of champion attributes. It highlights outliers and helps you quickly spot the most impactful champions for each role. Each plot focuses on two key attributes critical to that role, making it easier to identify standout performers within their category.
Take a closer look at this scatter plot. It compares champions across different star levels (1-star, 2-star, and 3-star) using their stats like HP and Armor. Notice something? While star levels boost a champion's stats (as seen by the upward shift in the chart), the relative rankings within each group remain unchanged.

For example, champions like Wukong and Shyvana maintain their positions as the strongest in their groups across all star levels. Lower-ranked champions, like Nilah, remain in the same relative position despite their stats increasing. This proves that while stars are essential for boosting raw power, they don’t influence the strategic role or rank of a champion within their group. That’s why all our analysis is based on 1-star champion data—it provides a consistent foundation for comparison.
Cost of the role
Once you know which champion you like, the next question is: how can you get it? This chart gives you a quick look at which roles are tied to different champion costs. It helps you figure out not only what to aim for but also when you might have the best chance of finding the champion you need. If you’re targeting specialized roles like Reaper or Fighter, you’ll notice they’re often tied to specific cost tiers, so keep that in mind as you build your team. This chart is a handy way to plan your strategy. It shows how champion costs connect to their roles, giving you insights on when and how to go for the champs that best fit your game plan.
Reroll Rates for Champions at Different Levels
This chart breaks down the reroll rates for champions at different costs across various player levels. It helps you understand when you’re most likely to find champions of each cost tier. For example, at lower levels, 1-cost champions dominate reroll chances, while higher-level players have better odds of finding 4-cost and 5-cost champions. Use this to plan your rerolls strategically and target the champions you need at the right time!
Role Determines the Positions
TFT is a strategy-based game played on a chessboard-like grid, where positioning your champions is just as important as selecting the right ones. Each champion plays a unique role—like Carry, Tank, Support, or Caster—and where you place them on the board can determine how well they perform in battle.

The visualizations below help you understand two critical aspects of positioning:
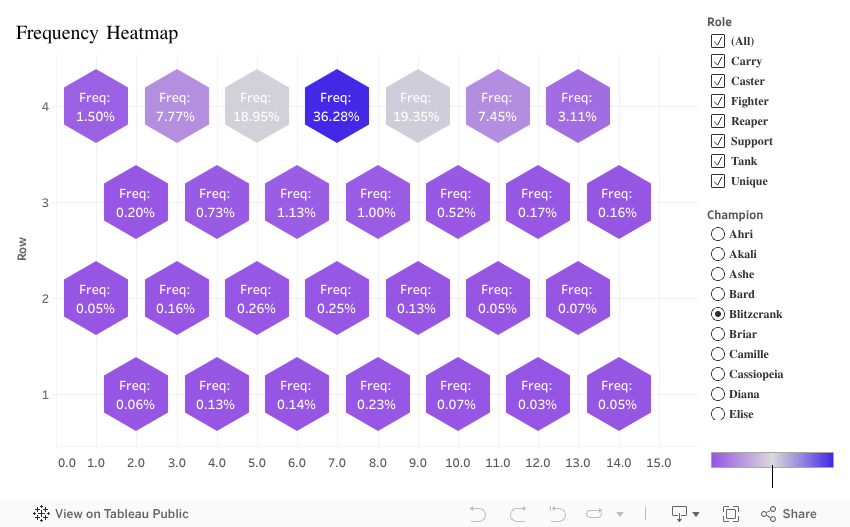
This grid highlights the most common placement positions for champions.
For example, tanks are often positioned in the front rows to absorb damage, while carries typically stay in the backline for protection.
This grid focuses on how positioning impacts performance.
You can spot which positions maximize a champion’s win rate, giving you
insights into optimal setups.
You can spot which positions maximize a champion’s win rate, giving you insights into optimal setups.

Insights:
Tanks = Often placed in the front rows, they absorb damage and protect the backline.
Insights:
Carries: Usually positioned in the backline to stay safe while dealing damage.
Insights:
Supports: Positioned strategically to buff allies or disrupt opponents.
Finally We can take a look at high rank gaming data...
Why is it important to know what we can learn from high rank gaming data?
It shows you how the best players play and helps you improve! High elo players are at the top for a reason—they know how to make smart choices, build strong teams, and position champions perfectly. By looking at their data, you can figure out what works, like which champions are the strongest, how to create winning synergies, and how to level up efficiently.
This data is like a cheat sheet for climbing the ranks. Instead of guessing, you can learn from the pros and use their strategies to play better, win more games, and reach your goals faster. It’s the easiest way to step up your game!

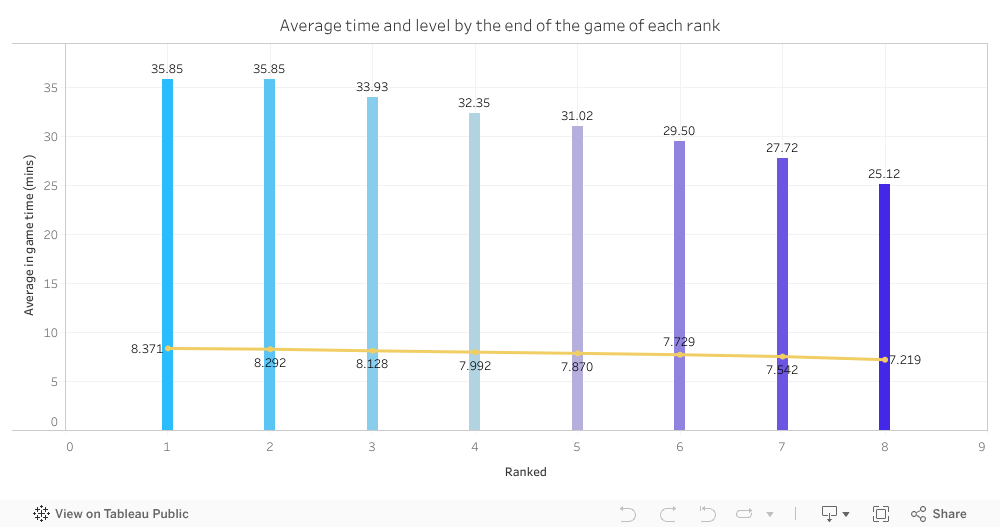
Game Progression
This bar chart gives you a quick snapshot of the average game duration for each placement, along with the average synergy counts. Curious how long games last at your level? Or how synergy usage stacks up as players climb the ranks? This chart has you covered! It’s a great way to get a feel for what to expect in your games and how gameplay evolves across different skill levels. Whether you’re just starting out or pushing for the top, it provides a solid starting point to understand the flow of the game at each placement.